Introduction
For the emerging technologies assignment, I was tasked to create a production piece using software we learned in our time in this module. As mentioned in the previous blog post about my project proposal, I want to create an experience that can be viewed in both virtual reality and web browsers about my journey when it comes to game development. To make this possible, I am using FrameVR which I can edit on my PC’s web browser, but also has a built-in VR mode I can view from a Quest headset.
Changes since last post
In my last post discussing my plan for my experience in FrameVR, I mentioned that I would not be able to use my own layout because I thought I’d be restricted with the templates that are provided. However, I noticed that there was an option for an “Empty” environment. This means that I am able to import shapes and models to create walls and geometry, so I can design my experience exactly how I would like to. This freedom will allow me to make a more customized experience and will allow me to showcase more of my creativity, which I wouldn’t have been able to do before with just premade templates.
Planning
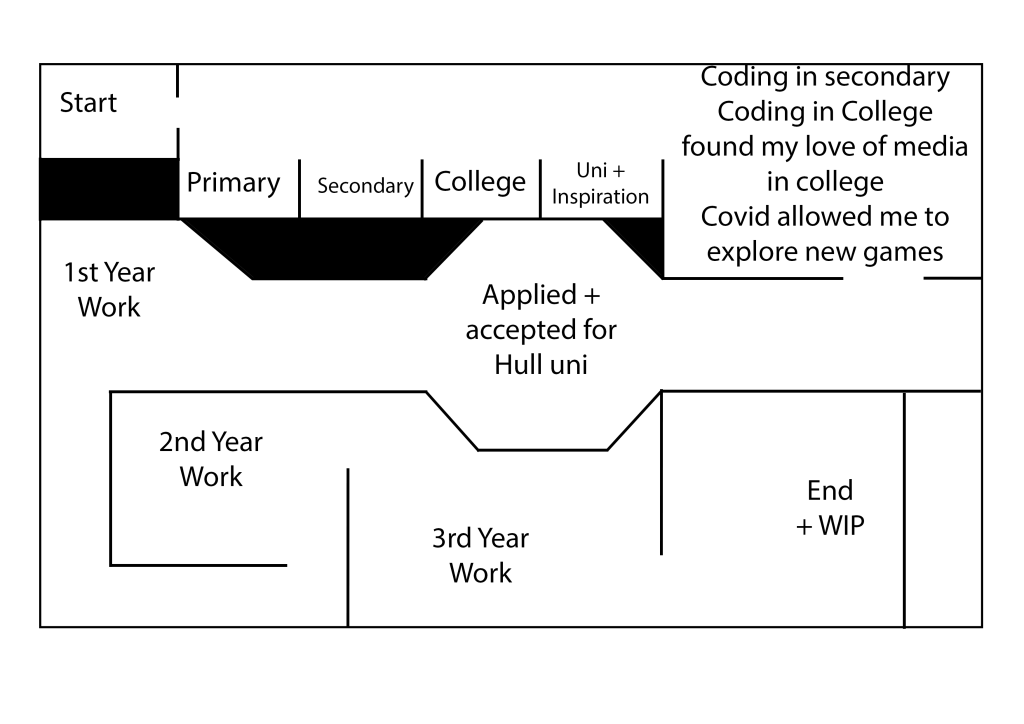
Before hopping into FrameVR, I wanted to create a map of what I wanted to create. This is so I can make a concept layout of how I want to guide the user around the area. As inspiration for my layout, I referenced a map of The Deep. When you go to The Deep, you start on the 3rd floor and slowly make your way down through each exhibit. The first exhibit you see is all about prehistoric animals before getting to more modern marine creatures. I want to apply this to my project by making the intro of my experience start with an introduction from me and how I grew up to be interested in Video games. The layout zigzags you back and forth, making the most of the space available. This concept can also be applied to level design, as it can be a good way to naturally guide players around the area I create. The Deep has a room towards the end of its experience where there is an open circular room which stands out from the hallways you were walking through previously. This room is a lot more open and has many aspects to it which allows you to walk around and experience and try different things, giving more freedom. I like the idea of including a large open space like this in my layout for similar reasons.
The Deep has verticality, which is very important for level design, however I will not be able to implement this into my design unfortunately due to the limits of FrameVR as a platform. If this feature was to be added in the future, or I decided to remake this project using a different software, I think this is one of the most significant things I would change.
As seen above, I made a mock-up layout of how I would like my experience to be. I decided to ask some peers about what they thought of this layout. I wanted to get a non-biased view, so I asked a couple of people with different experiences when it came to design. I asked another game design student, one of my coworkers, who is only vaguely familiar with games, and my mother, who doesn’t know anything about game design. I ended up getting similar feedback from them all, with them commenting that it was a layout that made sense in the context of my experience. The coworker additionally made a comment about how he thought it was great that I include some background initially. I thought it makes most sense going in order of events in my life, too, as it will make the content easier to follow as you move throughout. I also thought that an introduction with the games I grew up with and were influenced by would give someone a good idea on why I decided to get into game design. It will also give them a better understanding of how much I love games. I also decided that separating different parts of my journey with games using different displays would be a good way to get information across without it being too overwhelming. Splitting it into smaller chunks will allow me to better explain my thoughts about the games during that time when I record a voice-over for each area.
I also included different parts of school that got me interested in games, such as falling in love with computer science and coding in secondary school, and realizing how much I loved studying different forms of media in college. I think these are important to include because it is showing the journey of how I got to where I am now. It also gives some background to what I studied in school that would be relevant to a game design job to show that I’ve always been interested in that field. The area after that is a room dedicated to going to the University of Hull. This is significant as it marked a real turning point to where I decided to exclusively focus on my love for video games, whereas before I was mainly doing computer science.
The next 3 rooms I decided to showcase the work I have done since coming to uni. Separating them into the different years means that I can show my improvements since first coming to university. It will also allow me to discuss each year as a whole when doing a voiceover for these displays, allowing me to give my thoughts about the work I produced and what I learned and other interesting comments.
The end area will also have a “work in progress” area because I want it to represent the fact that I am still going down this game design journey and I have more to come in the future. This idea of a museum-like walkthrough of my game design journey could easily be expanded on after getting a job with the industry or after university. The way I imagine the end right now is to have some assets to hint at construction, for example having some gates covering an area, maybe scattered with some paint buckets, ladders, and curtains to cover what is behind. I think that is a really effective way to show that my journey hasn’t ended yet and more will be coming from me in the future.
Now I am happy with my basic layout, I will start to create the layout in FrameVR.
Creating in FrameVR
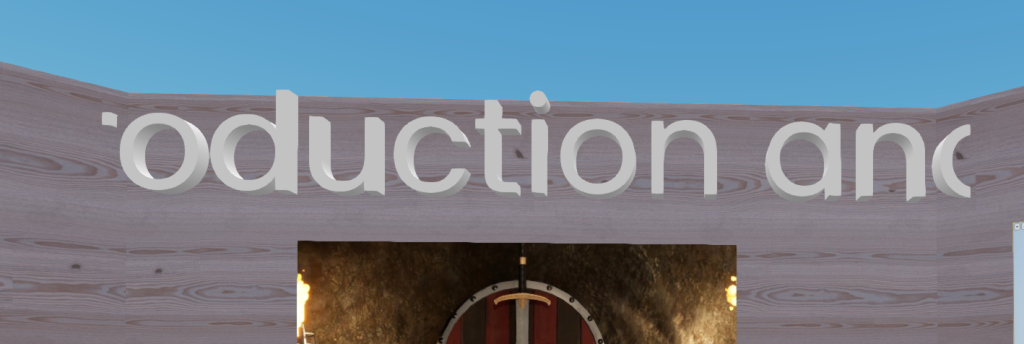
As mentioned before, I realized I could get more creative with the layout by using the “empty” map template and using walls to create the layout that I wanted. In the menu to import 3D models, there is an option to use FrameVR’s own assets, and thankfully there is a wall model that I could use. Unfortunately, due to how FrameVR handles models, when scaling the walls to be the length I needed, the texture would be stretched. I worked around that by putting different wall models next to each other, which was tedious and quickly got annoying. Another thing that annoyed me with this process was that the textures did not line up perfectly with the other walls I would place next to it. However, it was subtle enough that I decided to deal with it for this experience, as most of the user’s attention will be attracted towards the exhibits I create anyway.
Another issue I ran into when creating my layout is that the middle octagon in the photo will be really hard to create at that scale when having to work around the size of the walls. To get around this, I have had to make this space larger and stray from the initial design plan. The angles of the walls were also very hard to set perfectly to make a perfect shape, so it took many attempts to get it to a state that I am happy with.
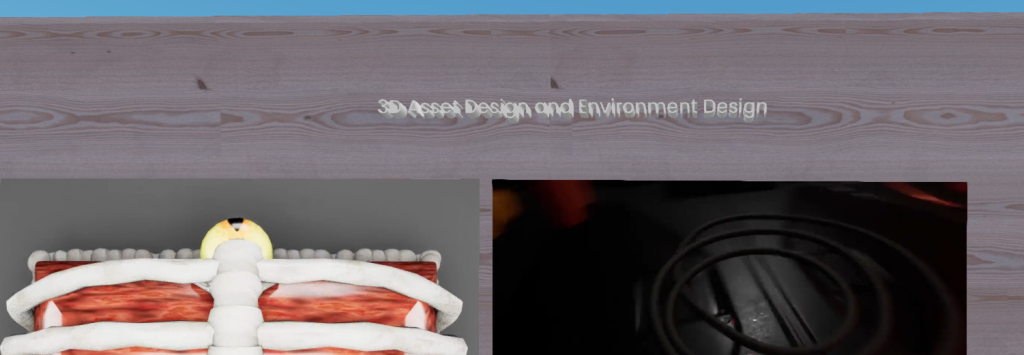
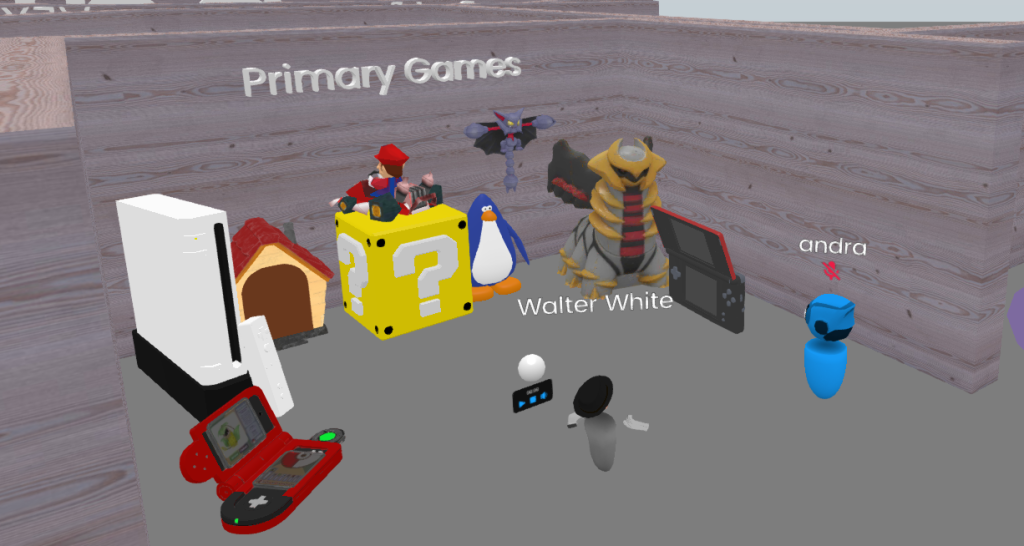
Now I am happy with the layout, The first aspect I wanted to get done is the intro displays of models from games I have been influenced by from childhood all the way up to present day. To do this, FrameVR has a built-in Sketchfab import tool. You can easily access this by going to add assets > 3D model > Sketchfab and searching for what you would like. I planned out a select couple games I wanted to have included in each display, and I will search for models on Sketchfab for iconic items from those games.
Thankfully, FrameVR has a built-in spawn point object I can place at the start of my experience. This was a lifesaver as before: I would occasionally spawn inside walls, which would have been horrible when inviting numerous people into the frame. Even more so when I had carefully planned out how I would like users to move around the experience. As you can see in the above screenshot, the layout is slightly different to the plan I drew up initially. This is due to the limitation with the wall size I mentioned previously. I decided to cut out the applying for university, and instead made the big area in the middle all about my 1st year at uni. The area after that is for 2nd year and then in the last room, I decided to combine the 3rd year and work in progress ideas because I haven’t finished the 3rd year yet so it makes more sense that way.
I added in assets in the order they will be viewed. The 3D models were very easy to import, however I needed to be cautious about the size of these models. This is because the more and more I added, the more demanding the scene would be, so I tried to keep these areas quite limited and concise. I was testing throughout on my Quest 3 in VR and also on my phone to make sure I would be able to run this on all platforms.
Limitations of FrameVR
Throughout the process of building my experience, I did notice some limitations with the software. The first limitation I ran into was that you can only have one web browser in your Frames.
This is really unfortunate because I was planning to use the browser for a couple displays, but I had to limit it to one. In the end, I used the web browser to link to this blog, specifically The page with a link to all the game prototypes I made in the 1st year of University. This is because I thought it was the display that would benefit from it most. The other displays are a mix of videos and photos, which is where the 2nd limitation I ran into came from. As it turns out, there is a limit of 512mb worth of assets per frame.
This limitation meant that I couldn’t include as much content as I initially intended in my experience. To try to maximize the amount of content I could include, I compressed and sped up some videos to reduce the file size as much as possible. These techniques helped me squeeze in a couple more assets, and make the most I could, however it would definitely be hard to add even more to this frame in the future unfortunately. This would mean that if I did want to expand with more work, I would have to consider a different software to create it in.
During my time creating my experience in FrameVR, I encountered a glitch where if I left and rejoined, it would mess with the scale of the text I use in my experience. Sometimes it would be scales to be too big and other times too small, seemingly randomly. This results in the experience looking buggy and wrong, which has a negative impact on what the user thinks of the experience. I had to keep resizing it whenever it would happen, but it would always break the next time I went back into it, which was very annoying.
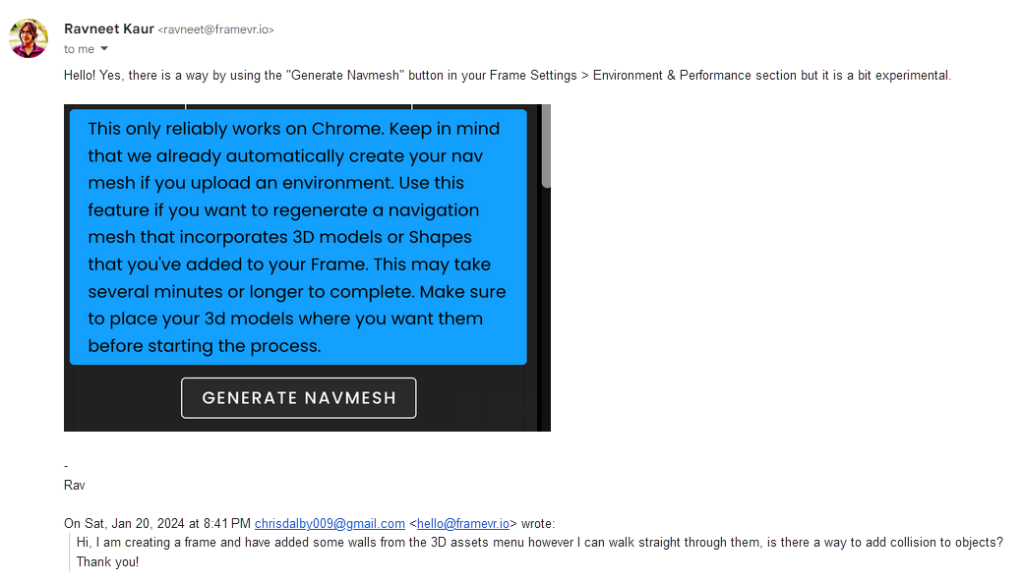
Another limitation of FrameVR is the lack of collision, as you can walk through the walls and any other model you can see in my environment. This makes it very hard to keep users on track, as it’s easy to accidentally go through a wall, especially if moving in VR by teleporting. I thought that surely I was missing something with collision, so I submitted a question to their forms and got this email in return:
However, when I tried to use this option, I got this error:
I tried to fix this and went through the article; however, it seems that there is no easy way of mapping the walkable areas unless you use one of their premade maps. Hopefully a feature is made to give the models themselves collision in the future.
Another limitation I was dealing with was exclusive to VR, where you can only move around through teleporting. This isn’t usually an issue as it’s usually more comfortable to move through teleportation for beginners in VR, however it makes it very easy to accidentally teleport through objects, and I personally prefer the smooth walking instead. Because of this, I was looking for an option to change controls to make it better for me. This is the email I received:
Ethics and Values
I think it’s important to consider many types of users that would interact with my experience, which is why I think accessibility is so important. This is one of the reasons I chose FrameVR as my platform, as even though it was built as a VR experience, it can be viewed on both computers and phones. This makes it accessible to users without a VR headset and Users that get sick while in VR. I do however find the Accessibility settings in FrameVR lacking. For example, the removal of a type of movement is odd to me, especially if some users prefer to move by walking instead of teleporting.
I think that the community aspect of FrameVR is also quite useful for my experience. This is so that I could be on the frame talking about the displays in the world and explaining in detail my thought process and taking questions about certain parts. I tested this aspect out with a friend to see what she thought about this aspect of the experience too.
The response I got was positive, she was very engaged and interested about the games that influenced me. She also commented that she liked the inclusion of the voice notes that gave her some context to what she was looking at. I noticed that the voice notes were important too as when she got to see the NCS display, she was confused about the photos at first but then listened to the audio and I think she really liked that part.
Reflection
Looking back on the whole process of building this experience, I think there are aspects that could be improved if I were to go back and redo this project again. I think that although FrameVR is good for accessibility for all platforms, It has plenty of limitations that held me back from making my ideal experience. The tools for creating the layout I wanted were very limited, and I could not have any verticality, which is a key component of level design. I think that FrameVR made it very difficult to move the walls in a way I wanted too, and it was very frustrating at multiple times during development, I felt very limited with my creative options in that way.
Another huge downside is that there is a limit of the content I can have in a frame, and I had already reached the limit and had to find workarounds. This means that if I wanted to continue this, I would likely need to move to a different platform anyway. I don’t think FrameVR is the perfect choice for my idea any more, at leats not in its current state.
That being said, given the limitations I was working with, I am proud of the experience I created in FrameVR.
References
whitevanman2014, (2017) ‘Excited toddlers couldn’t get enough of the ‘aquabatic’ sting rays.’ [Photograph] Available Online: https://www.tripadvisor.co.uk/ShowUserReviews-g186317-d256199-r491029184-The_Deep-Kingston_upon_Hull_East_Riding_of_Yorkshire_England.html [Accessed: 09/01/2024]
Am8iance, (2023) ‘Nintendo DS Lite‘, Sketchfab. Available Online: https://sketchfab.com/3d-models/nintendo-ds-lite-5443d1040f8f49e6a2edd532f11314ff [Accessed:14/1/2024]
AmedeDragon, (2023) ‘Giratina‘, Sketchfab. Available Online: https://sketchfab.com/3d-models/giratina-19d018c70d3b4a318ea8674b0b4084af [Accessed:14/1/2024]
nguyenlouis32, (2022) ‘Gliscor‘, Sketchfab. Available Online: https://sketchfab.com/3d-models/gliscor-ddae60ce56f740c08fcf434ab55d9f11 [Accessed:14/1/2024]
LukeTheLPSWolf, (2022) ‘Club Penguin recreation‘, Sketchfab. Available Online: https://sketchfab.com/3d-models/club-penguin-recreation-de2465c3d71d4ef8a5b9abf87128cda7 [Accessed:14/1/2024]
AidenB47455, (2023) ‘DS DSi – Nintendogs – Mario Kart Toy Mario‘, Sketchfab. Available Online: https://sketchfab.com/3d-models/ds-dsi-nintendogs-mario-kart-toy-mario-ee7b59a644bc4e729d83e01be840264d [Accessed:14/1/2024]
Yanez Designs, (2018) ‘Question Mark Block (Super Mario Bros)‘, Sketchfab. Available Online: https://sketchfab.com/3d-models/question-mark-block-super-mario-bros-be464a0b81384de79f49d38f5632c3f3 [Accessed:14/1/2024]
Dr. Heinz Doofenshmirtz, (2023) ‘My House – Animal Crossing.‘, Sketchfab. Available Online: https://sketchfab.com/3d-models/my-house-animal-crossing-5a75797cab174bcca666bfe0526c0f74 [Accessed:14/1/2024]
CharzyXD, (2023) ‘Nintendo Wii’, Sketchfab. Available Online: https://sketchfab.com/3d-models/nintendo-wii-ab8ec44686ca496981c6885fe59fa423 [Accessed:14/1/2024]
rowan_crossing, (2022) ‘Sinnoh (Gen 4) Pokedex‘, Sketchfab. Available Online: https://sketchfab.com/3d-models/sinnoh-gen-4-pokedex-da05070c8e8e444280421c421c38a1b7 [Accessed:14/1/2024]
MacDrawz, (2022) ‘Guitar Hero Guitar‘, Sketchfab. Available Online: https://sketchfab.com/3d-models/guitar-hero-guitar-67f08c75965e4d7da799b709ebaffe82 [Accessed:14/1/2024]
Ivanix88, (2017) ‘Xenoblade Chronicles Monado Sword‘, Sketchfab. Available Online: https://sketchfab.com/3d-models/xenoblade-chronicles-monado-sword-9c80266f99da44b8a581037d7591a944 [Accessed:14/1/2024]
Josevan Danusastra, (2023) ‘Joker Mask Persona 5‘, Sketchfab. Available Online: https://sketchfab.com/3d-models/joker-mask-persona-5-2c4a99ce4a764803b47849993cf2654b [Accessed:14/1/2024]
arnaud.sgz, (2022) ‘Hylian Shield and Master Sword‘, Sketchfab. Available Online: https://sketchfab.com/3d-models/hylian-shield-and-master-sword-44fbf95b67e24be88aeec1cee8b8f529 [Accessed:14/1/2024]
Reptlow, (2022) ‘Isaac‘, Sketchfab. Available Online: https://sketchfab.com/3d-models/isaac-9ec61d883eb04c79981cada6eb300af7 [Accessed:14/1/2024]
Pixman, (2024) ‘Portal Gun‘, Sketchfab. Available Online: https://sketchfab.com/3d-models/portal-gun-62476975b078452d80b2869ab634a324 [Accessed:14/1/2024]
mxdirector, (2013) ‘Bayonetta‘, Sketchfab. Available Online: https://sketchfab.com/3d-models/bayonetta-tB7q38pjeUXaVNNoORBhlBJAed9 [Accessed:14/1/2024]
Bluenoseddonkey, (2023) ‘Intelligence Briefcase‘, Sketchfab. Available Online: https://sketchfab.com/3d-models/intelligence-briefcase-5f51375a5fef49a39f646f7690657242 [Accessed:14/1/2024]
jameslucino117, (2023) ‘Research>Mechanisms>Vehicles>Samus’s Gunship‘, Sketchfab. Available Online: https://sketchfab.com/3d-models/researchmechanismsvehiclessamuss-gunship-a3b462d0a83d4d97a32cf2c10750f040 [Accessed:14/1/2024]
3Digify, (2015) ‘Scanned “Big Daddy” Figure (Bioshock)‘, Sketchfab. Available Online: https://sketchfab.com/3d-models/scanned-big-daddy-figure-bioshock-a7c9510860904bdbba7e69275cce711c [Accessed:14/1/2024]
Wesai, (2017) ‘Mother 3 – Sheriff’s Office‘, Sketchfab. Available Online: https://sketchfab.com/3d-models/mother-3-sheriffs-office-88a91697633842498a94094bc32b1182 [Accessed:14/1/2024]
Tom Zimmermann, (2023) ‘Persona 3 – Evoker‘, Sketchfab. Available Online: https://sketchfab.com/3d-models/persona-3-evoker-eb462da601b14fdaa559ef366d3160fe [Accessed:14/1/2024]
J-x-O, (2020) ‘Nier – Medium Biped‘, Sketchfab. Available Online: https://sketchfab.com/3d-models/nier-medium-biped-93842924070e4d3eb0538daec82d9061[Accessed:14/1/2024]
spencer.psi0918, (2024) ‘Metal Gear REX‘, Sketchfab. Available Online: https://sketchfab.com/3d-models/metal-gear-rex-c8bc0b0197974e43851305e52056c6e8 [Accessed:14/1/2024]
Guillem Cusidó, (2019) ‘Emil Nier Automata‘, Sketchfab. Available Online: https://sketchfab.com/3d-models/emil-nier-automata-58054aca17684d3b99472ca505c7237b [Accessed:14/1/2024]
Duznot, (2023) ‘Psycho-Portal’, Sketchfab. Available Online: https://sketchfab.com/3d-models/psycho-portal-bc143dfbd9f447778a56333aac3205bf [Accessed:14/1/2024]
buckeru, (2022) ‘Mask of Strength‘, Sketchfab. Available Online: https://sketchfab.com/3d-models/mask-of-strength-1171334e5a6d4bf8b48a42e048c8046d [Accessed:14/1/2024]
AX-7YK, (2022) ‘Pulse Blade Pilot (Titanfall 2 Fanart)‘, Sketchfab. Available Online: https://sketchfab.com/3d-models/pulse-blade-pilot-titanfall-2-fanart-489986a1332d4da680036a73746eefdb [Accessed:14/1/2024]
adventurer, (2024) ‘Death Stranding Cargo‘, Sketchfab. Available Online: https://sketchfab.com/3d-models/death-stranding-cargo-78172183341f4488a7001cdecf191ada [Accessed:14/1/2024]
Hunter Irving, (2015) ‘Pokey’, Sketchfab. Available Online: https://sketchfab.com/3d-models/pokey-984f6083c4624bd188f8faeeaf10d92a [Accessed:14/1/2024]

